Auto-Refreshing Spring Connection Pools on Kubernetes with Vault
Update Sept 14, 2020: I recently learned that you can instruct Vault Agent to run a command after rendering your template by using the command setting in your Vault Agent config. This eliminates the need of the inotifywait container that this post describes, although you can use inotifywait instead of the command setting if you want greater control over how modify events are handled.
For more information on the command setting, please refer to the Vault Agent Template documentation.
Many Kubernetes applications that fetch secrets from Vault also commonly enjoy the benefits of Vault Agent, which allows you to automatically refresh your vault token and fetch updates to your secret KV store. Vault agent is an excellent capability that makes connecting applications with services such as databases and messaging queues simple.
One thing, however, is often overlooked: How do you automatically refresh your connection pools?
Establishing the initial connection is easy – just run Vault Agent in an init container to fetch your service’s credentials and use those credentials when your main application starts. But, in Spring Boot applications, this connection pool is not automatically refreshed when Vault Agent updates your secrets. Sure, the underlying file containing your secrets has changed, but your connection pool will remain unaware of these changes unless you or an automated process explicitly refreshes this connection.
There are plenty of blog posts and documentation already on how you can manually trigger a connection pool refresh in your Spring Boot application. In this post, I want to take it a step further. Let’s automatically refresh Spring Boot’s connection pool in Kubernetes when your vault agent sidecar picks up new database credentials!
I’m only going to hit on the key concepts in this post, but if you’d like to dive deeper, I have a working demo in my GitHub repo you can follow along with to see this process hands-on.
The @RefreshScope Annotation
The @RefreshScope annotation is Part 1 of the magic. This annotation refreshes annotated beans within the Spring context when the /actuator/refresh endpoint is called. How will this help our use case? The Spring Cloud documentation can answer this best:
[@RefreshScope] addresses the problem of stateful beans that only get their configuration injected when they are initialized. For instance if a DataSource has open connections when the database URL is changed via the Environment, we probably want the holders of those connections to be able to complete what they are doing. Then the next time someone borrows a connection from the pool he gets one with the new URL.
Sounds like this will help refresh our connection pool! Before you can use it, however, be sure to include the spring-cloud-starter-config and spring-boot-starter-actuator dependencies, which contain the @RefreshScope annotation and the /actuator/refresh endpoint, in your pom.xml or build.gradle file. Here’s a POM example below.
<dependencies>
  <dependency>
      <groupId>org.springframework.cloud</groupId>
      <artifactId>spring-cloud-starter-config</artifactId>
    </dependency>
   <dependency>
      <groupId>org.springframework.boot</groupId>
      <artifactId>spring-boot-starter-actuator</artifactId>
    </dependency>
...
</dependencies>
<dependencyManagement>
  <dependencies>
    <dependency>
      <groupId>org.springframework.cloud</groupId>
      <artifactId>spring-cloud-dependencies</artifactId>
      <version>Hoxton.SR7</version>
      <type>pom</type>
      <scope>import</scope>
    </dependency>
  </dependencies>
</dependencyManagement>
Once you’ve included these dependencies, you need to apply the @RefreshScope annotation on your DataSource bean. Below is an example.
package com.austindewey.util;

import javax.sql.DataSource;

import org.springframework.beans.factory.annotation.Value;
import org.springframework.boot.jdbc.DataSourceBuilder;
import org.springframework.cloud.context.config.annotation.RefreshScope;
import org.springframework.context.annotation.Bean;
import org.springframework.context.annotation.Configuration;

@Configuration
@RefreshScope
public class DBPropRefresh {
    @Value("${spring.datasource.url}")
    private String url;

    @Value("${spring.datasource.username}")
    private String username;

    @Value("${spring.datasource.password}")
    private String password;

    @Bean
    @RefreshScope
    public DataSource getDatasource() {
        return DataSourceBuilder.create().url(url).username(username).password(password).build();
    }
}
Notice the two invocations of @RefreshScope: One above the class signature, and another above the Bean.
I found that I also needed to create a separate class containing each of the properties that need refreshed (spring.datasource.url, spring.datasource.username, and spring.datasource.password). Here’s what this class looks like:
package com.austindewey.util;

import org.springframework.boot.context.properties.ConfigurationProperties;
import org.springframework.stereotype.Component;

@Component
@ConfigurationProperties(prefix = "spring.datasource")
public class PropertyConfiguration {
    private String url;
    private String username;
    private String password;

    public String getUrl() {
        return url;
    }

    public void setUrl(String url) {
        this.url = url;
    }

    public String getUsername() {
        return username;
    }

    public void setUsername(String username) {
        this.username = username;
    }

    public String getPassword() {
        return password;
    }

    public void setPassword(String password) {
        this.password = password;
    }
}
Great! Now we have a refreshable DataSource bean and a class consisting of each of the properties we need to refresh automatically. Let’s take a look at the Kubernetes side of things, where we’ll employ two different sidecar containers – one that refreshes your secrets from Vault and another that refreshes your connection pool if your Vault secrets were updated.
Vault Agent
The rest of the magic happens on the Kubernetes side. Part of this has to do with Vault Agent, and the other part has to do with a tool called inotifywait.
Let’s start with Vault Agent.
Vault agent is a client-side daemon that automatically authenticates with Vault to handle token-renewal for the retrieval of dynamic secrets (such as database credentials).
Vault agent allows you to format your secrets using Consul templates. This is perfect for a Spring Boot application because you can write a Consul template to generate an application.properties file that contains your database credentials. Vault Agent will also keep this properties file refreshed, which will be important later to refresh your datasource bean.
Let’s look at the relevant portions of the Kubernetes manifest required to deploy a Spring Boot app with Vault Agent running as a sidecar. I’ll assume that Vault is already configured with the Kubernetes Authentication backend.
Manifest
First is a ConfigMap that contains the Vault Agent config. Here, you’ll find the Consul template that generates your application.properties file.
apiVersion: v1
kind: ConfigMap
metadata:
  name: spring-boot-postgres
data:
  vault-agent-config.hcl: |-
    vault {
      address = "http://vault:8200"
    }

    pid_file = "/home/vault/.pid"

    auto_auth {
      method "kubernetes" {
        mount_path = "auth/kubernetes"
        config = {
          role = "example"
          jwt = "@/var/run/secrets/kubernetes.io/serviceaccount/token"
        }
      }

      sink "file" {
        config = {
          path = "/home/vault/.token"
        }
      }
    }

    template {
      destination = "/deployments/config/application.properties"
      contents = <<EOF
    {{- with secret "secret/myapp/config" -}}
    spring.datasource.url=jdbc:postgresql://postgres-postgresql:5432/widget
    spring.datasource.username={{ .Data.data.username }}
    spring.datasource.password={{ .Data.data.password }}
    spring.jpa.hibernate.ddl-auto=none
    management.endpoints.web.exposure.include=refresh,health
    {{- end -}}
    EOF
    }
Next, in your Deployment, you need Vault Agent running as an init container to preload your database credentials before starting your application. You’ll also need a sidecar container to keep your secrets updated throughout your application’s lifetime.
Here’s the Vault Agent init container:
     initContainers:
        - name: vault-agent-init
          image: vault
          args:
            - agent
            - -config=/etc/vault/vault-agent-config.hcl
            - -log-level=debug
            - -exit-after-auth
          env:
            - name: SKIP_SETCAP
              value: "true"
          volumeMounts:
            - mountPath: /etc/vault/
              name: config
            - mountPath: /deployments/config
              name: shared-data
And here’s the Spring Boot application and Vault Agent sidecar:
     containers:
        - name: main
          image: quay.io/adewey/spring-boot-postgres
          imagePullPolicy: Always
          readinessProbe:
            httpGet:
              path: /actuator/health
              port: 8080
          volumeMounts:
            - mountPath: /deployments/config
              name: shared-data
        - name: vault-agent
          image: vault
          args:
            - agent
            - -config=/etc/vault/vault-agent-config.hcl
            - log-level=debug
          env:
            - name: SKIP_SETCAP
              value: "true"
          volumeMounts:
            - mountPath: /etc/vault/
              name: config
            - mountPath: /deployments/config
              name: shared-data
Here are the volumes these containers refer to:
     volumes:
        - name: config
          configMap:
            name: spring-boot-postgres
        - name: shared-data
          emptyDir:
            medium: Memory
This manifest lets you load your Vault secrets to your application Pod, but it doesn’t solve the problem of automatically refreshing your connection pool. Let’s handle that next using inotifywait.
Inotifywait
Right now, Vault Agent will refresh your secrets on the Pod filesystem, but the Spring Boot application will not load these changes to refresh the connection pool. To allow your connection pool to refresh, you have the following options:
- Restart your application
- Call the
/actuator/refreshendpoint manually - Create automation that calls the /actuator/refresh endpoint on a given interval (polling)
- Create automation that pings the /actuator/refresh endpoint when the application.properties file is updated (event-driven)
I like number 4, don’t you? We can achieve this by using a tool called inotifywait. Inotifywait comes from the inotify-tools package and, according to the inotify-tools GitHub page, is used to monitor and act upon filesystem events. We can use inotifywait to watch for changes to the application.properties file, and when a change occurs, we can automatically trigger the /actuator/refresh endpoint. Let’s look at the manifest required to set this up.
Manifest
To set up inotifywait to automatically refresh your connection pool, you need to create another sidecar container alongside your Spring Boot container:
       - name: inotifywait
          image: docker.io/pstauffer/inotify:v1.0.1
          command:
            - /bin/sh
            - -c
          args:
            - |-
              while true; do
                inotifywait -e modify /deployments/config/application.properties;
                curl localhost:8080/actuator/refresh -X POST;
              done
          volumeMounts:
            - mountPath: /deployments/config
              name: shared-data
You can see how this works by focusing on the “args”. You can see an infinite loop that and instructs inotifywait to hang until it detects a “modify” event against the application.properties file. Once a modify event occurs, it triggers the /actuator/refresh endpoint to refresh the connection pool, and the loop starts over. In this example, the image I’m using that contains the inotifywait tool is docker.io/pstauffer/inotify:v1.0.1. If you’re interested in employing this solution, I recommend writing your own image that contains inotifywait or at least be aware of the risks of running third party images from Dockerhub.
Demo
Want to see a demo of all this in action? Please check out my GitHub repo for more information. I highlighted the key details in this post, but I’ve written out a step-by-step demo in GitHub you can follow to get hands-on experience with this process.
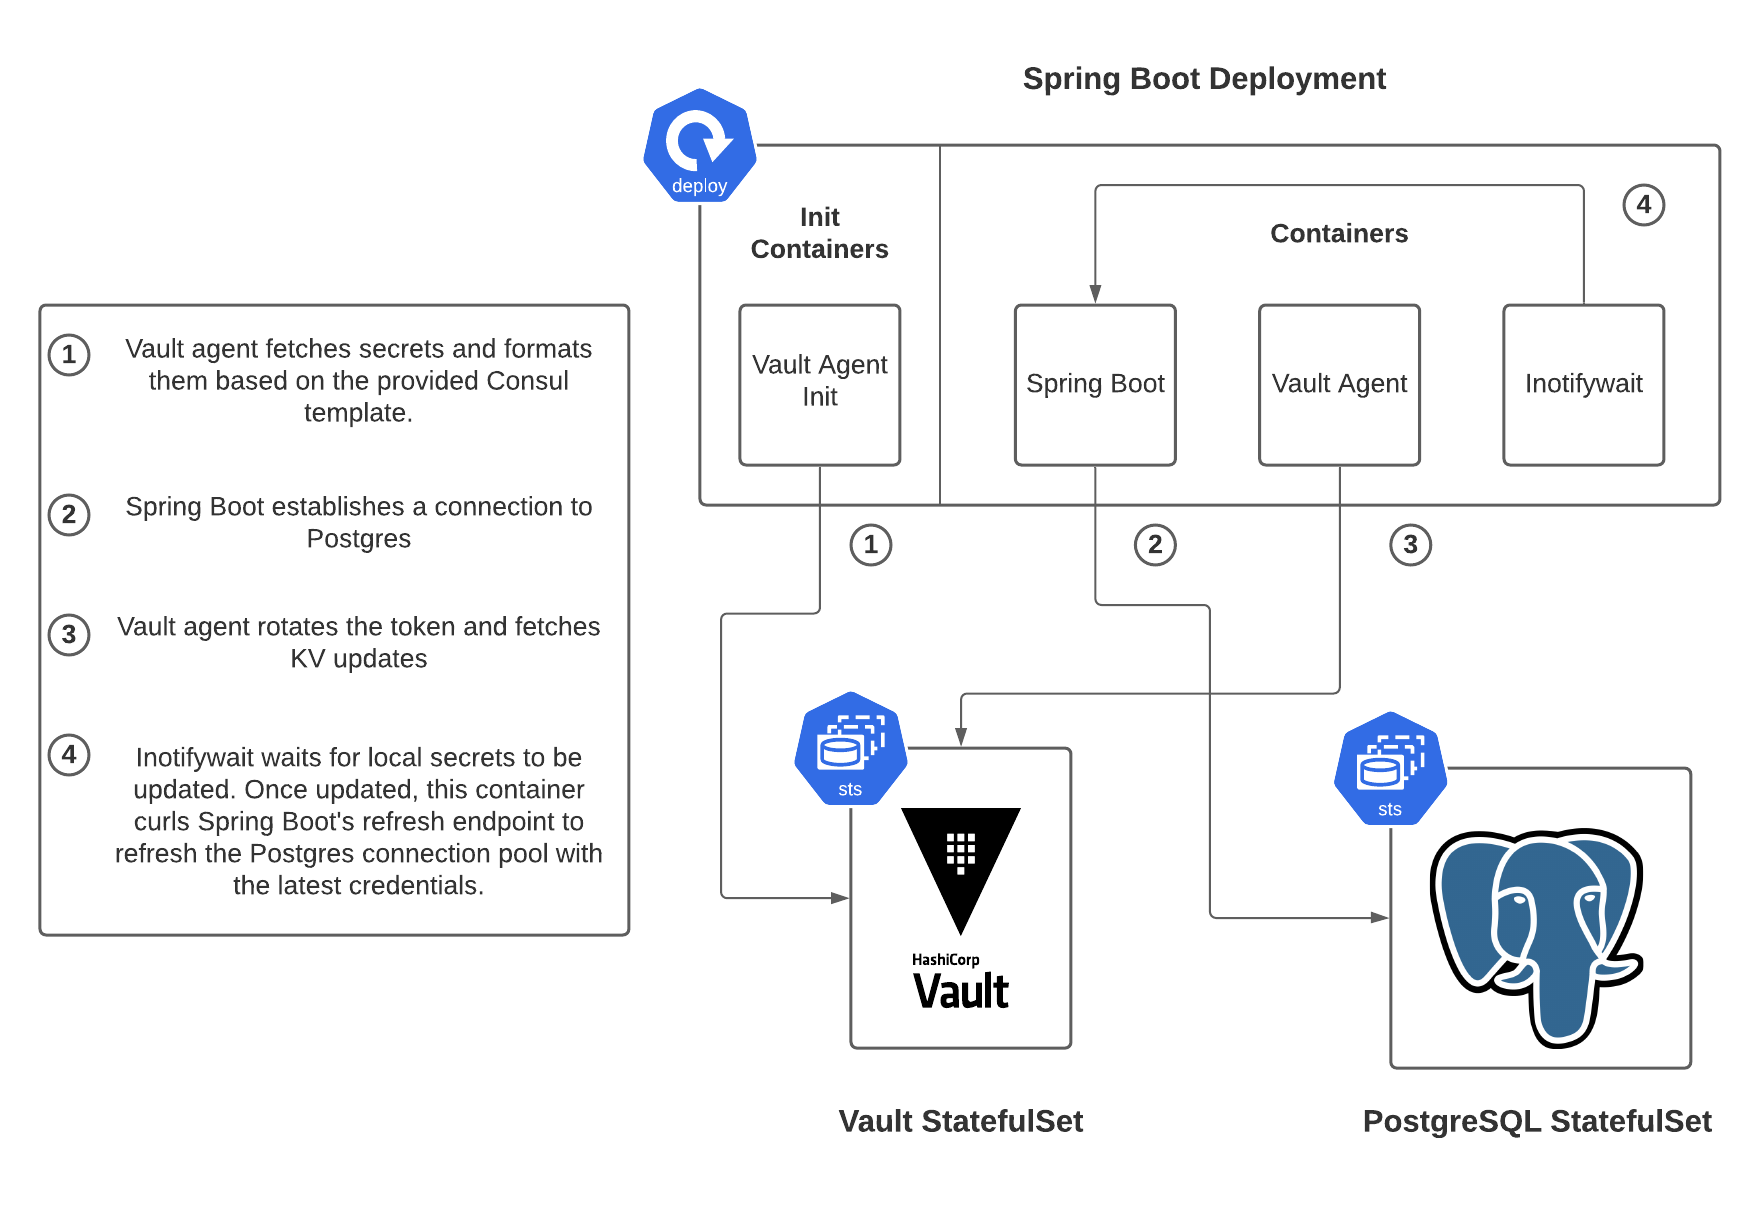
If you follow along with the demo, you’ll build the following architecture, utilizing the components discussed in this post.
Thanks For Reading!
Hopefully, you find this to be a compelling solution to a long-standing issue. It’s simple to use Vault Agent to keep your dynamic secrets updated, but it’s more challenging to refresh your Spring Boot connection pool once those dynamic secrets are updated. The right solution for you will depend on your company’s stack and direction, but this solution provides a starting point for you to begin thinking about how you can solve this tricky problem within your organization!